Looking for an easy way to schedule your social media status updates to one or many social media profiles? HootSuite is just the tool for you! Check out these step-by-step directions.
HootSuite Directions
- Go to the following website: http://hootsuite.com/
- Click on the Login button on the top right hand corner of the page
- If you have already created an account, enter your email address and your password.
- If you haven’t created an account you will need to do so. You can create an account for FREE by following the directions on your screen.
Once you are logged in you will see your activity.
To Post a Status Update
To access the HootSuite Launch Menu, click the Home Icon on the upper left hand corner of your screen.
To Compose a Message Using HootSuite
- To send a message immediately, click inside the “Compose message” field and type a message.
- Then, select a social network or networks from the list on the right and click “Send Now”.
How to Schedule a Message Using HootSuite
Want to schedule a message to send out later? Here’s how:
Here’s how:
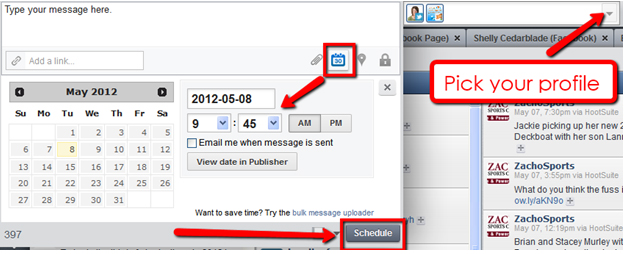
- After you type your Message, click the button with the calendar icon. A calendar will then pop down, enabling you to set the date and time.
- Next choose your social network profile(s) you would like to send the message to.
- When finished, click the “Schedule” button to schedule.
How to Edit a Scheduled Message in HootSuite
Once you have scheduled a message, HootSuite gives you the option to edit it.
Here’s how:
You will first need to create a “Scheduled” column. To do this:
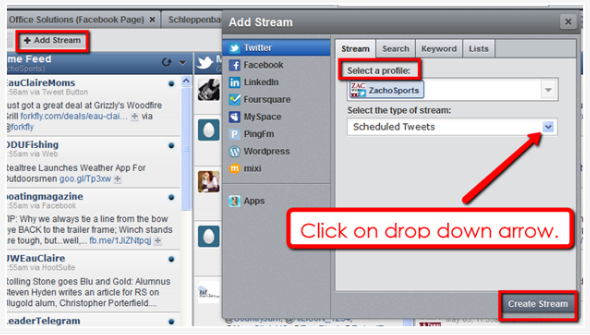
- Click “Add Stream“
- On the left side of the Add Stream box select the appropriate social profile (Twitter, Facebook, LinkedIn, etc.)
- Select a profile
- You will then need to “select the type of stream,” select “Scheduled Tweets”
- Finally, click “Create Stream“
- Once your Scheduled Tweets column is created, you will see a list of tweets that are scheduled to be sent. To edit a scheduled tweet, hover your mouse over a message.
- You will then see an “Edit” link.
- Once you click the “Edit” link, you can re-schedule the tweet or edit the content of your message.
- To finish edit, click “Schedule“. Or click Cancel if you do not want to change your message.
These same directions apply to Facebook. Instead of “tweets” they will be “messages”.
How to Add a Link in HootSuite
With HootSuite adding a link (URL) is simple. Here’s how:
- First click on the Compose message field
- Click “Add Link“. Then paste your URL (or link) inside that text field.
- Click on “Shrink”
- The shortened URL will appear in your Compose field. It will appear as an “owl.ly link”. In this example it appears as: http://owl.ly/aLSO.
How to Upload an Image or Document in HootSuite
Here’s how:
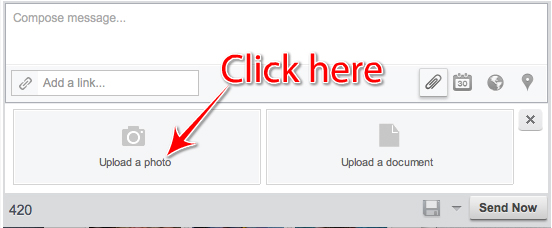
- Click the “Compose message field“, and then click the paperclip icon.
- Next a pop up will appear asking you choose a Twitter profile to upload to. Because of certain API restrictions, you must first choose a Twitter profile to upload. Then click on your profile you would like to upload an image to (Facebook or Twitter). (Note: If you are uploading an image to Facebook, the image will not be posted to your Twitter profile only to your Facebook profile. If you do not have a Twitter profile, you will have to create one to be able to post an image using HootSuite.)
- Then, after clicking the paperclip icon, a window will pop up prompting you to select the type of file to upload. Choose either “Upload a photo” or “Upload a document”.
- Once selected, there will be a progress bar indicating the status of the upload.
- Then, select your profile from the profile picker to the right of the message compose box
Once this is finished, an ow.ly link will appear in your Status Update text field. This is a link to your file – which is hosted on HootSuite’s ow.ly’s servers. After you send your Status Update, your file will be shared with everyone on your Social Network.
Scheduling your status updates in advance with links and attachments is easy with HootSuite. If you have questions regarding HootSuite, contact me or visit our Facebook page. I am happy to help!


Recent Comments